
Unlock the Secrets of Amazfit GTS 4 Screen Replacement: A Step-by-Step Guide
, by Great Deal, 2 min reading time
, by Great Deal, 2 min reading time
Are you the proud owner of an Amazfit GTS 4 smartwatch, but have you encountered a cracked or damaged screen? Fear not, my friend! In this blog post, we'll dive into the step-by-step process of replacing the original LCD screen and digitizer assembly on your beloved Amazfit GTS 4.
Before we get started, it's important to gather the necessary tools and materials. You'll need a small screwdriver set, a pair of tweezers, and, of course, a replacement LCD screen and digitizer assembly for the Amazfit GTS 4. Make sure to purchase a genuine, high-quality replacement part to ensure a seamless and long-lasting repair.
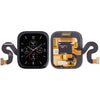
Gently remove the watch strap and the back cover of the Amazfit GTS 4. This will expose the internal components, including the screen assembly. Carefully disconnect the screen connector from the mainboard, taking note of the orientation for easy reassembly.
Using the small screwdriver set, carefully remove the screws that secure the screen assembly to the watch body. Gently lift the old screen out, being mindful of any adhesive or connectors that may still be attached.
Take your replacement LCD screen and digitizer assembly and align it with the watch body. Secure the new screen in place using the screws you removed earlier. Reconnect the screen connector to the mainboard, ensuring a secure and proper connection.
With the new screen in place, it's time to put your Amazfit GTS 4 back together. Carefully replace the back cover, making sure all the components are properly aligned. Reattach the watch strap, and you're almost done!
Finally, power on your Amazfit GTS 4 and test the new screen. Ensure that the display is functioning correctly, and all the touch gestures and features are working as expected. If everything looks good, congratulations! You've successfully completed the screen replacement process.
Remember, screen replacement can be a delicate task, so take your time and be gentle throughout the process. If you encounter any difficulties or have additional questions, don't hesitate to reach out to the manufacturer or a professional for assistance.
Enjoy your newly revived Amazfit GTS 4 and the satisfaction of having completed a successful DIY repair. Happy wearing!
Replacing the screen on your Amazfit GTS 4 smartwatch doesn't have to be a daunting task. By following this step-by-step guide, you can breathe new life into your device and continue enjoying its features and functionalities. Remember to always use genuine replacement parts and take the necessary precautions to ensure a successful repair. Happy tinkering!